Monday, December 19, 2016

MOTHER HELDERMAN'S BANANA PUDDING


I am sharing this recipe for all of my former and current students.  Several years ago I began making banana pudding for our FCCLA meetings; this has become a fan favorite.  I could not even begin to guess how many GALLONS I have made. I am not sure why this is so popular; maybe it's a comfort food, maybe it is because we share this treat at our meeting with friends, maybe it just tastes good.  Perhaps all of those theories are true.  

At any rate, I am always asked to share the recipe.  It is so incredibly easy and the amounts can be multiplied many times to accommodate the crowd you are serving.  Here is the basic recipe which serves about 4 people.  The amounts do not have to be exact; you will see the measurements are pretty vague.  The size of the bowl and your personal preference for banana/graham cracker ratio are all factors.  

1 large box instant vanilla pudding mixed according to package directions
1 cup whipped topping
2-3 bananas
crushed graham crackers
fruit fresh

Add whipped topping to prepared banana pudding; blend well
Place a layer of crushed graham crackers in the bottom of bowl.
Add a layer of sliced bananas; sprinkle with fruit fresh (unless you are eating this immediately)
Add a layer of pudding/whipped topping
Continue the layering as many times as necessary.  I like to end with pudding and top with graham crackers.  I think it makes a better presentation.  

****This is not a dessert that holds for a long period of time; it will get soggy so plan on serving in a few hours.
****Choose low fat milk and sugar free pudding for a lower calorie option.

The pictures show a LARGE quantity I made for a wedding reception.  This is also the amount I make at school--serving about 60 people.  SUPER easy!

Supplies for a crowd!


Not going to lie; this makes a big mess!


Enjoy!


Saturday, October 8, 2016

HOME COFFEE ROASTING


I have been roasting coffee for about five years; first in an electric popcorn popper and then on my gas grill with an aluminum pan and wooden spoon. Three years ago my husband gave me an electric roaster for my birthday. It is a coffee roasters dream! Until I started roasting I knew nothing about the roasting process and the origin of green coffee beans.  

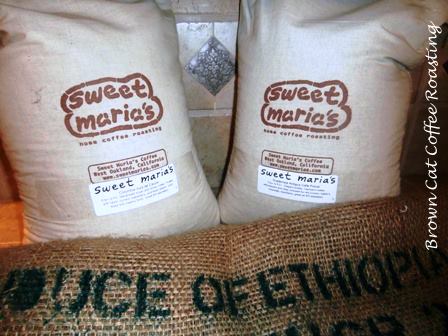
First, it is necessary to purchase green coffee beans.  My source has always been Sweet Marias.  I have nothing but praise for this company.  Their products and consumer service are great.  It is always a good day when a new shipment of coffee is delivered; these are 20 pound bags.

The burlap bags recycle into all kinds of great projects including pillows!


I use a Hottop coffee roaster.  This machine allows you to roast about 1/2 pound of green beans. Basically, you choose the setting and the machine does all of the work.  Filters are necessary and need to be replaced periodically; you can see the dust in the filter on the right.
The roaster preheats and is ready for beans at 167 degrees. 

Coffee beans are a little like fruits and vegetables; there are different seasons and production times and each has a distinctive flavor.  If you look closely at the three varieties you can see a slight difference in the size and color of the green coffee beans.


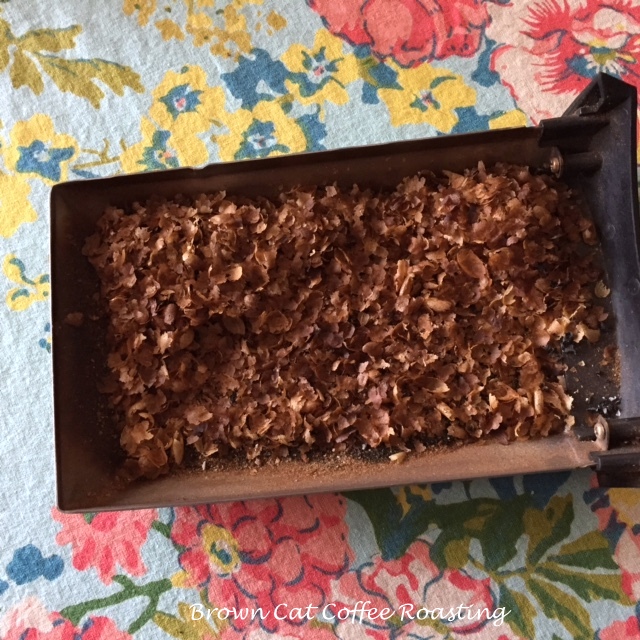
As the coffee roasts it "cracks" twice; first at about 300 degrees and then at about 380 degrees. The roasting beans also produce "chaff".  Different varieties produce different amounts.  My roaster collects the chaff in a tray which must be emptied after every roasting.


I prefer strong, dark coffee so I always select varieties of beans that roast at a high temp.  I normally roast for about 22 minutes with the temp reaching about 390 degrees.  At that time, the roaster dumps the beans into a tray and stirs them for about 5 minutes to cool.


Here are the same beans after they are roasted and ground.  Again, if you look closely you can see a difference.


The only disadvantage I have found to home roasting coffee is that it is very hard to go back to the "other side" and buy commercially roasted coffee.  This is the best coffee EVER.  If you would like to try home roasting without investing in a roaster, please see my blog from April 2015 on roasting with a Whirley Pop popcorn maker.

Here is the finished product; packaged and ready to go!


Enjoy!

Tuesday, August 2, 2016

QUICK AND EASY CINNAMON ROLLS


Is there anything more delicious or comforting than a homemade cinnamon roll? This recipe can be made in advance and then baked when you are ready to serve them; perfect for the holidays.  I have used this recipe for many years at school; it works with 45-minute class periods and beginning bakers!  Here is the recipe:

2 cups flour (plus an additional 3-4 cups for a total of 5-6 cups)
2 packages of dry yeast (4 1/2 teaspoons)
1/2 cup sugar
1 T salt
1/2 cup softened margarine or butter
1 1/4 cups very hot tap water or warm milk (105-115 degrees)

2 eggs, beaten

Filling:
3/4 cup sugar
1 T cinnamon
Mix well and set aside

1/2 cup butter or margarine SOFTENED, not melted

Mix 2 cups flour, yeast, salt and sugar in a large bowl; blend ingredients.  Add softened butter or margarine, water or milk, and beaten eggs.  Mix well. Gradually add flour until dough forms a soft ball and pulls away from the sides of the bowl. 

Turn dough onto a lightly floured board and knead (using a fold, push, turn motion) for about 5 minutes until dough is smooth and elastic.  Cover dough with a towel and let rest for 20 minutes.

Lightly flour a cutting board or your counter and roll dough into a rectangle, about 12 x 18" and 1/4" thick. Spread softened butter or margarine on dough making sure to spread to the edges.  Sprinkle cinnamon/sugar mixture on top of butter/margarine.

Begin rolling the dough toward you.  You will want to end with the "seam side" down.  I usually need to "reshape" the roll a little making sure the entire length is about the same diameter.

I usually cut my rolls about 1 1/2" thick; this really is a matter of personal preference. I make a mark using a ruler to keep them about the same size.  Cut the rolls using a piece of thread or plain dental floss.  Using a knife will flatten the roll; the "string method" works great!

Place the rolls in a lightly greased 9" x 13" pan.  Cover lightly with plastic wrap and refrigerate 2-48 hours.  When ready to bake, remove plastic wrap and place rolls in a preheated 375 degree oven.  Bake for 25-30 minutes, be careful not to over bake.  Drizzle warm rolls with powdered sugar glaze:

1 cup powdered sugar
2 T melted margarine
1/2 t vanilla or almond flavoring
Add enough milk to reach desired consistency; you can make this as thin or thick as you like


Toss the flour, salt, sugar and yeast in a bowl; mix well
Add eggs, softened butter or margarine and water
Continue to add flour until dough forms a soft ball and pulls away from the sides of the bowl
Turn dough onto a lightly floured board and knead until smooth and elastic; about 5 minutes

Cover dough with a towel and let rest for 20 minutes

Roll dough into a rectangle about 1/4" thick or about 18" x 24".  Spread softened butter or margarine over the dough; sprinkle cinnamon sugar mixture on top.
Roll the dough toward you placing the "seam side" down.  Cut rolls about 1 1/4" thick; sometimes I mark the place with a knife.  Cut rolls using plain dental floss or string--works much better than using a knife!
Place rolls in a lightly greased or parchment lined pan.  This recipe made 16 rolls.  Even though I marked the dough for cutting my rolls are not exactly the same size.  No worries, call them artisinal or rustic and enjoy!

Monday, July 11, 2016

HOT DILL PICKLES

Say hello to the tiniest, hottest pickles you will ever meet!
These tiny hot pickles have become a tradition in my family.  While this is a labor intensive endeavor, they are a real treat, especially during the holidays and for special meals.  The key to success is picking the cucumbers in the "baby stage"--2 inches or less.  I like to make the pickles as soon as I bring them in from the garden.  No special ingredients are needed.  Here is the recipe and directions:

In addition to cucumbers you will need dill seed and red pepper flakes. Sometimes I add whole peppercorns, dill weed if I have it, and garlic. 
Sterilize the jars you plan to use.  To prepare the brine, combine 3 cups water, 2 3/4 cup vinegar and 1/4 cup salt in a saucepan.  Bring to a boil.  Place the spices in the bottom of the sterilized jars. For an 8 ounce jar, I use 1 T. pepper flakes, 1 t. dill seed, and 1 t. crushed garlic, and a few peppercorns.  The amount of spices you add is a matter of personal preference--these are SUPER hot---you can make them less spicy!
Place the cucumbers in the jar, cover with hot brine (leave 1/2 inch head space), cover with lids and rings and process in a hot water bath.  I process the smaller jars for 6 minutes and pints for 10 minutes.
Safety is critical in food preservation; please click here for additional information.

Crushed red peppers, dill seed, peppercorns and garlic

Enjoy these tiny delights!

Monday, July 4, 2016

HOMEMADE BREAD---EASY REFRIGERATOR METHOD


Delicious homemade bread in just a few easy steps!
Think you can't make homemade bread??  Think it involves a whole day of mixing, kneading, rising, shaping??  This easy recipe will allow even beginners to enjoy freshly baked bread with a minimal investment of time. Since this is a refrigerator method, it can be made well in advance of baking---it is a GREAT time saver.  I have used this recipe for years at school; if it works with 45-minute class periods you can imagine how easy it is at home! 
Here is the recipe:

2 cups flour  (you will need an additional 3-4 cups for a total of 5-6 cups)
2 pkgs. dry yeast or 4 1/2 teaspoons if you buy yeast in a jar.
2 T sugar
1 T salt
1/4 cup softened butter, margarine or olive oil
2 1/4 cups VERY hot tap water 100-115 degrees F


Simple, inexpensive ingredients
Mix 2 cups flour, yeast, sugar and salt together; blend well.  Add hot tap water and fat; I like to use olive oil but softened butter or margarine will work just fine! 
Mix well.  Gradually add flour until the dough forms a ball and pulls away from the sides of the bowl. (I usually leave mine a little "soft", you can add more flour as you knead).


Toss the dry ingredients in a bowl and mix well
Add the hot tap water and fat, stir well
Gradually add flour until the dough forms a ball and pulls away from the sides of the bowl.  Don't worry if it is a little soft; you can work in more flour as you knead.
Once you have added enough flour, turn the dough out onto a floured board and knead using a fold, push, turn motion.  Kneading will develop the gluten and give the bread structure; usually takes about 5 minutes.  The dough should be smooth and elastic and you should see air bubbles begin to form.   Cover dough with a towel and let it rest on the counter for 20 minutes.

After kneading--the dough is smooth and elastic; small air bubbles have begun to form.
Cover with a towel and let the dough rest for 20 minutes
Lightly grease the pan/pans you will be using; I usually use parchment paper for the braid. You can shape into crescents, loaves, rolls, etc. Here are the directions for making a braid:

Cut the dough into three equal pieces
Shape the pieces of dough into three "ropes"; these are about 16"--let the braiding commence!

Tuck the ends "under".  If desired, lightly oil the top of the braid and add poppy or sesame seeds. Cover LOOSELY with plastic wrap; the bread will rise during refrigeration--it needs room to grow!

That's it!  The original recipe says this can be refrigerated 2-48 hours but I have found the bread loses some of its volume after 24 hours. I think the quality is best between 2-8 hours of refrigeration.  Remove the plastic wrap and bake in a preheated 375 degree oven for 30-35 minutes or until golden brown. Experiment with various shapes, whole grains, honey, etc. and make this your own creation; happy baking!


Wednesday, April 20, 2016

SAVORY BREAKFAST CASSEROLE


Crusty bread with a delicious egg and cheese filling. Pair with fresh fruit and/or salad and you have a complete meal.
Easy, inexpensive, prepare 24 hours ahead of serving time? If that is your kind of recipe you are going to love this breakfast casserole! Even though it is called a "breakfast" casserole, feel free to serve this crowd-pleaser at any meal. This is what I call a "skeleton" recipe;  you can use ingredients you have on hand, add your own  herbs and spices, and tailor it to suit the guests you will be serving. You can make this extra hearty, light and healthy, fat free, even gluten free!

Here are the basic ingredients you will need:
4 cups milk
8-10 eggs
1/2 pound cooked meat of your choice, optional
1 loaf French bread, cut into cubes
1/2 pound cheese, cubed or shredded, choose something that melts
1 teaspoon salt
1/2 teaspoon pepper
1 teaspoon ground mustard (in the spice aisle, not prepared mustard)


Time saving tip: prep ingredients (cut, chop,measure, mix) in advance.
Don't confuse ground mustard with prepared mustard; this adds some "kick" to the dish.
Lightly grease a 9 x 13 pan or line the bottom with parchment paper.  Place 1/2 of the bread cubes in the bottom of the pan; top with cheese.

You can use regular "loaf" bread--I like the crusty texture of French bread better. Feel free to use whole grain, homemade, or gluten free.
If you are using meat, sprinkle it on top of the bread/cheese layer.  Remember, the meat may be omitted or you could choose a lower fat/soy based product. The recipe calls for 1/2 pound; you could add more for heartier appetites.  Make sure it is cooked, well drained and seasoned; I used ham. Add the remaining cheese.

Almost done!  For the final step, you will top the casserole with the remaining bread cubes. Mix the eggs, milk, and seasonings together and pour over the top. 


Your work is done!  Cover with foil and refrigerate 24-36 hours.  When you are ready to serve, bake the casserole in a 350 degree oven for 40-45 minutes. I usually remove the foil during the last 15-20 minutes of baking. I often find that it takes closer to an hour or a little longer for baking time. I check the temp with a thermometer; when it reaches 160-165 degrees, it is safe to serve. Click here for additional info on safe handling of eggs.

Enjoy!